Wednesday, July 10, 2013

America's Cup Fiasco

This post has nothing to do with ship in bottle building so if you don't care for the Americas Cup just skip to the previous post.  Just thought I'd air some frustration.  

Well I was very excited for the America's cup.  I love the idea behind the AC72's and they are really a beautiful and fast sailing ship.  I was really looking forward to seeing them race on Sunday....then on Tuesday ....now I still am.  Trouble is there is drama behind the scenes that has made for some pretty lonely one boat racing.  It's kind of like watching a sword fighter battle the air or a dancer do the salsa with out a partner.
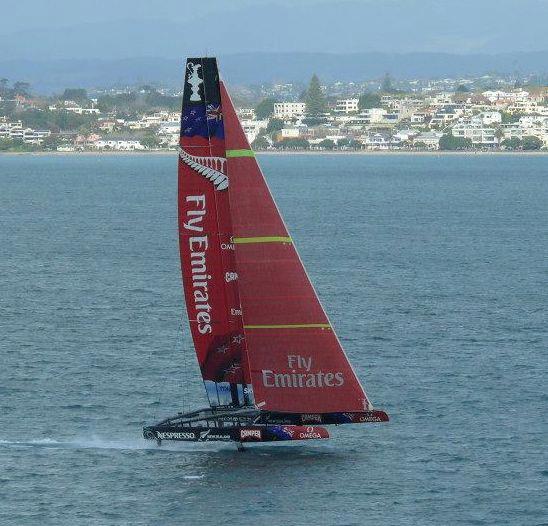


For those that don't know the story I'll try to sum it up best I can.  Keep in mind I only started following the Americas Cup a month or ago so I am may not be totally current with history or terminology.  The trouble started when the Regatta Director Iain Murray announced some new safety rules a week before the race.  These included things like last minute adjustments to foils heavier boats and deeper rudders for better control.  Sounds all well and good except that Luna Rasa and New Zealand protested the changes and now Luna Rasa is waiting for an international jury to decide whether it's fair or not before they race.  This lead to more finger pointing and drama leaving New Zealand to race alone.

At first I wanted to sympathize with the protest since changing major aspects of the ship a week before the race is pretty screwed up.  Looking further into it though I understand the need for the rule change.  The AC72 is a 7 ton ship that regularly sails faster than 40 knots, or close to 50 mph for us land lubbers.  With the increase of speed and size also comes a decrease in control.  Since the ships use a hydro foil and raise up on their rudders the surface area of the rudder becomes even less which of coarse means less control.  This had lead to the two of the ships flipping over and even the tragic loss of Artemis Teams crew member Andrew Simpson on May 9th.  So between May 9th and the start of the races in July they have been investigating the causes and finding ways to prevent them.  They came up with 37 new safety rules and implemented the a week before the race.  Could this have been done sooner?  Or could they have talked more with the teams before announcing new rules all of the sudden?  Welll....who knows I'm just a couch potato captain waiting to see a good race.

I will point out though that this is nothing new to the Americas Cup.  There have been times when they have spent more times in court rooms arguing than they spent on the water actually racing.  It sounds ridiculous but you have to keep in mind what the Americas Cup races actually mean.  It's not like the Olympics where they are trying to find the best sailing team.  Or like drag races trying to find the fastest car.  The Americas Cup is all about winning and holding onto the Americas Cup.  This is why the New York Yacht Club held onto it for 132 years.  He who holds the cup sets the rules.  In this case Oracle Team USA.

Really the mess the Americas Cup is in falls on Oracle.  I think they reached a bit far on deciding to use the AC72's.  The cost of the ships has forced the majority of the teams to drop out leaving only four.  Had we more teams in the race we may have actually seen a race by now.  It's obvious that the AC72 is cutting edge sailing technology but I think it needs more testing and adjusting to gain the mix of control and speed it's really capable of.  The races this year would have fared better if they would have added foiling technology to the AC45 and ran with that.  At the very least I think we'd have more teams in the race.

Of coarse what does this couch potato captain know.  Can you really blame Oracle for pushing for the fastest craziest ship they could?  It took 132 years to loose the cup from New York it could very well do the same some where else.  So when you get a chance to set the rules why not run with it?  Except that the America's cup has become more than a bunch of rich guys racing overly expensive yachts.  It's become a money maker.  The reason they switched from the mono hull yachts to the multi hull catamarans was to bring the race closer to shore and which allows for spectators to watch the race.  With spectators comes money.  Team apparel sales, ticket sales, concert sales.  As a business the Americas Cup can do very well.  Unless you can't get the race started with more then one boat.

I read an article recently where Louis Vuitton is asking the Americas Cup for a refund of 3 million dollars.  I guess the fiasco has left the sales of their 11,000 dollar America's Cup watches as low as the fans disappointment.  On the bright side if this keeps up maybe I can afford one.  I really wanted to like the Americas Cup. Last year was so incredible.  The AC72s are really incredible.  Putting the two together would be spectacular.  I guess I'll just have to wait and see.  We're only a few days in.  There's time to turn this around and still have some incredible racing.  Mean while enjoy a piece of last years racing.  If you haven't seen it already it's a ton of fun to watch.


Monday, July 8, 2013

Seagulls

"You'll go a long way before you see seagulls in bottles." - George Fulfit

This concept behind this post started with the documentary "Steady as She Goes" about George Fulfit a ship in bottle builder who made a trade mark of putting seagulls in his bottles.  

I watched this video a long time ago and had always kept the idea in the back of my mind.  I saw that George  carved his seagulls and made the wings out of Styrofoam.  The seagulls worked well for his bottle but they seemed to be to big for the ones I was building.  Months later I saw seagulls again in a bottle by Heather Rodgers.  Again I wondered how this was done.  Heather's answer was simple.  The seagulls are paper built up with paint.  

I decided to experiment with idea it came out so good I used it as a finishing touch for my recent Yacht America.  


The first thing to do when making a seagull to go into your bottle is get the right shape.  I did a quick Google search on seagull outlines to get the right idea.  They are actually quiet simple, point for a head curving wings and a fan like tail. Once I got the general shape I found I could draw the wings head or tail in different ways to get different mid flight type poses.


Once the seagull is drawn I start on the wing color.  Mostly because it's easier to do before the gull is cut out.  There are many different types of gulls so they can be any variety of colors.  The ones I've seen most often though have grey wing with black tips.  I draw in the grey with a pencil making it as feathery as possible and then draw deep black streaks on the tips of the wings with a black colored pencil.  Once that is done I cut the seagull out with an exato knife.


Now it's time to get out the paint.  I use acrylics since they wash out with water and are so easy to use.  They also have a way of clumping when you paint over a surface multiple times which is good and bad.  For seagulls it's a good thing.  I put a nice big glob of white paint on the body and let it dry if my seagul is still looking a little flat I add another one and let it dry until I have a nice looking gull.

I then move on to the beak and feet.  Sometimes I use orange for this sometimes yellow just depends on what I want at the time.  With the gulls being so small I just dip a toothpick in the paint and then dab it onto the beak and press in two dabs for the feet.  Chances are no one will see the feet but it's fun to know they are there.  The last part is folding the wings.  I fold the wings where they connect with the body then round them out like they are catching the wind.  This is important in that they will be glued to the bottle by the wing tip.  Now they are ready to fly.


The last part is the most tricky and is probably best done with an ear polypus.  Since mine broke I've been stuck using coat hangers so I made one that cradles the seagull while I get it in position.  I use super glue to glue the seagull to the side of the bottle where I want it to be flying around.  Put just a dab of glue on the side of the wing and touch it to the side of the bottle where you want the gull.  Then hold very very still.  Super glue and glue in general has a weird tendency to not dry when it's moving.  I also will note to be very careful putting glue on the sides of your bottle.  If to much glue is applied it can distort the glass and distract from the seagull and the ship.

Also a word of caution with super glue.  Normal grocery store super glue which is what I use has a lot of fumes.  If you cork the bottle before the glue is dry the fumes fog up the inside of the bottle and is very hard to clean.  If you use super glue leave the bottle open with the top facing up to let the fumes out.  I let it sit like this three to five minutes while the glue dries.  Hold the gull in place until it looks like the wing is firmly glued to the bottle.   If you end up getting some unwanted glue on the side of the bottle don't worry about it.  It's inevitable with seagulls.  Get a long dowel and attach an exacto knife at a 45 degree angle at the end.  Once the glue dries use the blade to scrape off the unwanted glue.

Now slowly pull the wire out until your well clear of the seagull.  With the gull being so small the paper holds it's weight on the wing and the gull appears to be flying around the bottle.   I didn't have a whole lot of time so the gulls I made for this post aren't as good as they can get.  Have patience and work with it and you can get some pretty good looking seagulls.


Thursday, July 4, 2013

America's Cup

I'm so excited for the 34th America's Cup.  The new AC72's are some of the most fascinating ships I've seen.  It will be a lot of fun to see them race.  Check them out.


For more info check out http://www.americascup.com/.


Sunday, April 28, 2013

The Wreck of the Brigantine

I've been so busy with life I haven't been able to put together a post.  I wanted to put something up so people know I'm still out here so I went through some old photo's and came up with a short something to put out there.

First a few shameless plugs on upcoming posts and things.  I'm hoping to have a post up soon about putting seagulls in bottles.  I still have to get some photo's done and I'll have it up as soon as I can.  

Also if you've seen my gallery lately you may have seen my latest ship the Santa Maria.  I hope to do a post on that one as well but not until after September since it will be featured in the Bottle Shipwright a magazine created by the Ship in Bottle Association of America.  For more info on the Bottle Shipwright or to become a member of SIBAA check out the SIBAA website.  

So now a couple very old pictures.  This is a brigantine I built quiet a while ago.  Keep in mind this was early in my learning of the craft so the ship is not that great.  At least by my current standards.  


I show this to point out that some times things go wrong.  In this case horribly wrong.  I was trying to use a technique where I would pull the masts into place using a line attached to the base of the mast that then ran into the hole for the mast and out the bottom of the ship.  The technique worked great at first.  The ship was very easy to insert into the bottle.  The only problem with it was the amount of lines coming out of the bottle was tremendous and beyond what I could handle at the time.  

I began tightening the lines and got the foremast into place but couldn't keep all the lines tight.  I tried to resolve this by gluing a few lines and cutting them off.  Trouble is I glued the wrong line and the spanker mast would not come up at all.  I worked on it for a few hours before I decided enough was enough and there was nothing I could do.  At the time I didn't have the equipment to cut the lines that far into the bottle so I felt my only option in correcting the mistake would be to just pull it out and hope it didn't break to bad. 

I got it to the bottle neck and got some pliers on it and pulled it out.  It all but shattered.  The back stays got pulled too tight and tore the bulwarks off the ship.  Masts and yards broke into splinters.  To fix the ship now would be to rebuild it altogether.  

At that point I was done with the ship.  I had spent to much time to have it end so horribly.  So I kept what scraps were left and moved on to other projects.  I eventually came back to it and realized it didn't look like much any ways so it was finally disposed of.  My point of this post though is some times stuff happens.  A build goes horribly wrong or busts into pieces and then never sees the light of day, but you know, that's okay.  To perfect your craft you have to just keep going.  

I learned a lot from this failed brigantine.  It taught me to stretch my abilities and where to draw the line.  I learned what worked for me and what didn't, like a too many lines coming out of the bottle.  Each ship after has been the same.  I try something new adapt it if it works and leave it if it doesn't.  My hope is to make each build better then the last.  

There's only one thing I could have done differently with the brigantine which I probably should have.  Which is to stuff the piece's back in the bottle push them into the sea and call it a shipwreck in a bottle.  The fun of ship in bottle building is that even when you screw it up, it works.  

Good luck and keep learning.   


Wednesday, February 13, 2013

Building The HMS Bounty

I am long over due a new post and have been contemplating what to write next.  There is actually a lot of new techniques I have picked up in the last while due to a community build in the SIB community.


I'm sure most have heard now of the sad sinking of the HMS Bounty in hurricane Sandy and with it the tragic loss of her Captain Robin Wallbridge and crew Claudine Christian.  For me it was an instance of you don't know what you had until you lost it.  In truth I barely knew the ship existed previous to her sinking. I was soon awaken from my obliviousness as the model ship building community took the news very hard.  I've read many posts of sadness, commemoration and memories of visiting the ship.

I guess it's no surprise that I never knew much about the Bounty.  I have always lived in one land locked state or another.  What I found though was that I didn't grow up seeing this ship on the ocean but seeing it on the silver screen.  From Treasure Island to Pirates of the Caribbean I had seen this ship several times.  I didn't know the ship but yet I did.


The SIB Facebook forum was no different in lament and commemoration of the HMS Bounty and her lost crew members.  Photos, memories and plans filled the forum.  It was then suggested that a community build be done in commemoration of the HMS Bounty.  The rules were simple.  Build the Bounty and post your progress.  Size, plan, and length of time didn't matter.  Which I think is the true beauty of the ship in bottle art.  The only constraint is it has to go into a bottle.  So a bunch of us began our logs and started posting progress.

SIB builders on the forum have since been building the Bounty.  Greg Alvey, who created and updates an incredible site www.folkartinbottles.com, created a page where all of the current builds can be seen together.  Here's the link. http://folkartinbottles.com/workshop/building-the-hms-bounty 

The great thing about the community build is it has created a way to learn and try new techniques from more experienced SIB builders.  I have been able to glean information I would never have thought of.  Some of these new techniques I will include in this post.

I started the usual way by carving out the hull.  I decided on doing a really small build.  I had been reading a lot on miniature SIB's and figured I'd try it out.


I then worked on the forecastle.  I ended up cutting match sticks to splinters and gluing the splinters on the ship.  Other builders used styrene which I may have to try out.


I continued using match sticks to create the channels and chain plates.


I painted the ship with acrylics and after checking it against a few photos I decided that my bulwarks were to high.  So as I cut the top of the ship down to size.


I did worry a little that the gun ports would not be big enough to put the cannons through but they ended up ok.  You can also see in these photo's a much nicer deck then I usually have.  The great part about the community build is that I was able to get ideas from other builders doing the same ship.  As I watched Cecil Tiller build his ship I noticed his deck planking looked great.  So I asked how he did it.  He told me to take clear finger nail polish and coat the deck.  After it dry's use a razor blade to cut the lines where the planking should go.  Then stain the deck.  The interesting thing about this method is that the stain darkens everything but where the nail polish is.  Creating awesome and very visable contrast in the deck planking.  To see more of Cecil's work click the link  http://folkartinbottles.com/workshop/building-the-hms-bounty/223-cecil-tiller-building-log  


I went on to add the bow and the deck furniture.  The helm was made by cutting a seed bead in half.  This was kind of crazy but it worked.  The cannons are pieces of wire.  I build the launch out of match sticks using the same method I outlined in a former post "Ready the Longboats."  The winch was made from match sticks and bamboo.  The great thing about bamboo is that it remains strong even when it's cut very thin.  The capstan is just a splinter glued in a hole with the top painted red.  

The hatches were tricky and I stumbled upon a new technique in creating them.  I noticed that Greg Alvey did a terrific job on his hatches and I asked how he did it.  He explained that he took the picture of the deck plan stained the hatches and glued the paper down as the hatch.  I couldn't get my printer to print small enough with out the lines running together so I initially thought I will just stain some paper and no one would notice there were no lines in the hatch anyways.  As I was gluing the paper down I pressed it down firmly with the exacto knife I was using to position it.  I noticed the knife left a small divot in the paper.  I then started lining up divots until I had all the lines in the hatches.      


I like to add anchors on all of my ships and the Bounty was no different.  This time I got some smaller wire and made them particularly small.  


It was then off to the rigging yard.  The masts and yards were all made from bamboo with paper and paint making up the platforms.  I tied a lot of thread blocks since the masts were to small to drill through.


I wanted to go with a more realistic rigging but then chickened out and used a usual SIB rigging.  This constitutes the sheets all running aft to either the stay or mast behind the yards they control.  That sentence was a bit technical for a beginners blog.  Kudos to those that understood that.  In lay mans terms the tan lines that control the sails are run towards the back of the ship.


My rigging was a little different with this ship.  I used a shallow hole to set the masts instead of the usual hinge method.  This gave me a little more flexibility getting the ship in the bottle.  I made it so the masts still folded backwards but used a slightly different technique on the mizzen mast.  Since the forward stay ended at the base of the fore mast and I didn't want to drill a hole through my ship I had the line exit the top of the mizzen mast.  I did this specifically because of the bottle and sea method I was using would allow it.  Typically I wouldn't rig the line that way.


I found a couple new methods on the shrouds that worked out well.  I had recently seen a technique where the back stays are weaved back and forth through the ship. I wanted to try this technique but the size of the ship and angle I would have to drill made it all but impossible to go through the ship.  So I drilled three holes below my chain plates where the chains would have been attached to the ship.  I bent a small piece of wire a U shape with a gap just big enough to put thread through the U.  I glued the wire in the hole and bent it upwards to act as the chain.  I tried to make them so the came just below the bottom of the chain plate.  I then threaded my back stays through the U of the chains back and forth as I had seen in the threading technique.  With the ship being so small I only had to dab paint on the lines going over the chain plate to make it look like they were going through the chain plate.

The other method I used for the shrouds above the platforms.  I really got tired of gluing tiny piece of thread to the back stays and decided to make a jig that would help me make ratlines.  I tried using pins and wood and things but they all just failed.  Then I found tape.  I used my finger nail polish bottle to wrap masking tape around so that it was sticky side up.  I then carefully measured and applied thread to the sticky side of the tape with three lines to create the stays and a row of lines to create the rat lines.  Once they were all pressed firmly onto the tape I slid the bottle out leaving my rat lines in mid air attached to the tape.  I poured on the super glue and blew off the excess so I didn't have any between the lines.  Once it dried I cut out my shrouds and glued them onto my masts.


Once the rigging was done I used drawing paper to make my sails.  It was probably a bit thick but it holds it's shape well which gives it a good full of wind effect.


Once the sails were complete it was time to build the sea and bottle the ship.  For the sea I used a technique from a video posted on the facebook site a while back.  Robert Little explains the technique better then I can so I will let him tell you.  The explanation starts at the 4:40 second mark.


Using Robert Little's technique this is what I came up with.  I used cardboard instead of wood since it was more readily available.  


Once that was done I put the ship in the bottle.  The bottle I originally planned the Bounty to go into a light bulb but it didn't clean out well so I used a Christmas ornament turned upside down.  The Bounty is a little small for it but not overly so.    


You can see with the sea being able to move around in the bottle why I didn't worry about having lines coming off the front and back of the ship.


Here you see the ship is all set up and ready for the finishing touches on the sea.  I added a little clay to make it appear to cut through the water as well as a small wake behind her.


Here is the completed HMS Bounty in a bottle. I cut a hole in a block of wood and glued the top, now bottom of the ornament into it.  I then painted on the name as well as my name and year completed.


This one was a lot of work.  The small size and amount of detail put it made for a very long build.  At least longer then I'm used to.  In then end I'm pleased with the results.  Thank you for reading and if you haven't yet seen the other HMS Bounty build logs please check them out.  They are all very well done.  http://folkartinbottles.com/workshop/building-the-hms-bounty

Saturday, December 8, 2012

Rigging the Yacht America

With the presentation to the Rocky Mountain Shipwrights a week away the Yacht America is finished and ready to go.  I thought I'd take this opportunity to show her off and talk a little bit about rigging.


There are several ways to rig ships in bottles.  I chose the simplest form for the America which is the hinge method.

In this photo you can clearly see the hinge at the base of the mast.  This hing allows the masts fold back so that the ship fits in the bottle.  After the ship is in the forward stays are pulled tight raising the masts back into position.  There's a lot that goes into creating a ship that can do this but before I go over that I want to go over some very basic parts of rigging.

There are three basic parts of rigging.  The back stays the forward stays and the sheets.  The stays hold the masts straight up and down with the back stays pulling the masts backwards and the fore stays pulling them forwards.  The sheets move the sails in order to best catch the wind.

In building rigging in this method I recommend starting with the back stays.  To me these are the most important of the three.  They control not only the forward back ward angle of the mast but also the left and right.  The lines have to be precise or the ship will not look right.  If they are to loose the mast will lean forward.  If they are too tight they will lean backward.  If on side is to tight or to loose they will sit sideways.  You need to get it where you want it glue it down and hope it works.  They can try your patience a bit.

The next step is the fore stays.  These run from the top of the masts to the bow and out of the bottle.  They are then used to pull the masts up when the ship is in the bottle.  Once the mast's are in position the fore stays are glued down and cut as close to the bow as possible.  The tricky part about fore stays is getting them to run to a point where they can be easily cut and glued while in the bottle.  To do this you will either need to drill holes in the mast for the lines to run through or build thread blocks.  In my opinion thread blocks are the way to go.  It's hard to drill though a sanded toothpick and if your not careful the mast you spent all that time sanding and painting will break and you'll be starting all over making a new one.  Thread blocks eliminate this problem.  I've posted this link before but, in case you haven't seen it John Fox III, whose America ship in bottle I heavily based this one on, has posted a great video on how to create thread blocks.

http://vimeo.com/46158123

Finally the sheets.  In a real ship I dare say there is no such thing as a decorative rope.  Each line has a use and a purpose.  SIB's are different in that sheet's are typically decorative and serve no function in folding or unfolding the masts.  It is smart though to be aware of them while you build.  It's horrible not being able to fold your mast's back because a decorative sheet line got in the way.  Typically with SIB's the sheet's move to the back of the ship so they fold back with the masts.


It's important before building your rigging to have a plan especially when the rigging gets complex like a square rig or my recent stay sail schooner the Star Flyer.

  
I tried to make this picture as big as possible so you can see the details.  This is the rigging plan for the America.  Filled in circles are places where the lines are tied down to the masts.  Open circles are thread blocks.  Arrows are where the lines run out of the bottle.


The last thing I will talk about in this post is the flag.  Almost all pictures of the America I found have her flying a flag so I decided to include it.  I did a little research to make sure I had the right one.


The America won the America's Cup in 1851 which is also the year the US got it's 31st state.  So I did a little research and found a 31 star flag.  I then used Photoshop to create a version that could be folded in half.
I ran a line between to thread blocks and glued knot inside the fold of the flag.  This allows the flag to be raised or lowered to find the best look.  I personally like it raised high.  Here's a few other flags I've used in the past.  


Also the eagle on the back of the America.  


This one I glued on the back and painted around so it would blend in.  It will probably not be able to be seen after the ship is in the bottle but it's still a fun detail.  


I also included some other details on deck including life boats and the iconic cockpit around the tiller the America is known for.  


Thank you for reading about my yacht America.  I will update this post after the meeting and include the finished bottled ship.  If your in the Denver area come join us on December 15th at Rockler Woodworking and Hardware. 2553 S. Colorado Blvd.  Denver CO 80222.  


Tuesday, November 20, 2012

On High Seas

I recently joined a ship building club in the Denver area and it has been a blast.  It's nice to find out there's people as crazy about ships as I am.  Here's their website for any one interested.  http://rockymountainshipwrights.org
The group consists of mainly static ship builders which makes me the only SIB builder.  This being the case they have asked that I give a presentation on SIB building at one of the monthly meetings.  No pressure right?!  I accepted and went to my SIB forums on Yahoo and Facebook for ideas.  After some discussion I settled on the Yacht America.  The America was the first winner of the One Hundred Pound Sovereign cup which was later renamed the America's Cup after the first ship to win it.


I will post more photo's of the ship it's self later.  What I wanted to go over in this post is putting sea into a bottle.  There are many ways of getting sea into a bottle.  There are also ways of going with out it all together.  In this post I'm going to describe the modeling clay method.  

There are pros and cons to each method of putting sea in a bottle.  Some of the con's of modeling clay is that it has a hard time sticking to the glass.  For the most part this isn't a problem but I have had one or two bottles where the sea came dislodged and the ship and sea began bouncing around in the bottle creating a huge mess.  One thing you can do is push it down hard and hope it sticks.  Ninety percent of the time it will.  Another method I've had success with is holding the bottle over a hot burner and melting the clay through the bottle.  It only takes a few seconds over the heat to melt the clay enough that it sticks to the glass.  Do one half of the bottle at a time use oven mitts and be careful not to burn yourself.

Another con I've had is the temptation to push the ship down into the clay and let the clay hold the ship.  It worked a few times but for the most part the ship comes dislodged and again bounces around in the bottle.  You have to glue your ship down no matter what.  I use white glue since it doesn't  fog up the glass.  So far I haven't had any problems with it.

The pros of modeling clay is the shape ability of it.  I have had a lot of fun shaping waves and white caps through out the bottle.  Clay is relatively easy to move around and shape the way you want it.  Also it doesn't stick all over your bottle like some putties do and what residue is left is easy to clean.  Finally it doesn't take a whole lot of time depending on how much detail you put in it.

Ok enough jabbering on to the photos!


This is the bottle I'm going to use.  It's a beer bottle I got from a friend.  Nothing to special about it really.


 I start by spreading the clay out to determine thickness and size.  As with my ships I build big and cut small.


Here I have cut the sea to size.  One important thing to note is the width of the sea.  For bottles where the bottom is round like this one it's important to keep the width of the sea small.  If the sea is wide it will curve up the sides of the bottle and potentially hide the hull of your ship.  If the bottle is rounded keep the seas thin.  Also ignore the match stick it's just keeping the bottle from rolling.


Next fold the clay so it will fit in the bottle.  It's imprtant to simply fold and not push it together since you will be unfolding it in the bottle.  Try and keep the sides from touching as much as possible.


Now put it in.  This is the easiest part.  Just slide it on in.  It is important at this part to look at where the clay is going to rest.  I don't like having the seam of the bottle obstructing the view of my ships so I turn the bottle so the seam runs across the top and bottom.  Then position the clay over the seam.


Once the clay is in use a coat hanger to unroll it.  I put a hook in mine and twist it back and forth until it come  open.  This will take some patience.


A good trick I do is once the clay is open far enough flip it over and push it down until it flattens.  As soon as it's flat enough position it exactly where you want it.


The next step is to add the waves.  I take my coat hanger and push down and back on the clay so it creates a little mound.  Then I pull the top forward to shape a wave.  Do this all over until you get the choppiness of the sea that you like.  


Here's just a couple other angles of my now choppy sea.


Now to add the white caps.  Get some white modeling clay an put a tiny amount on the end of your coat hanger.


Get it in the bottle and press it on to a wave or wherever you would like a white cap.


Use your hook to shape it until you get the look you like.  Use the same push pull method to get a good wave look.


Now do it all over and get the sea to look the way you like it.


I forgot to add a space for my ship.  Adding this space is easily done out side the bottle but can be done while it's inside as well.  I used my coat hanger to pull the middle out.  Once the ship is in I will push the sea into the sides until it looks right.  I will also use some white clay to make the bow look like it's cutting through the water and to create a wake behind the ship.


Once the sea is done you can wipe down the inside of the bottle with a dry cloth to get out any residue left by the clay.  I just put a cloth on the end of my coat hanger through a bit of a loop.  Rebber bands work well to attach it too.  I also wash the out side of the bottle and dry it with a dry cloth.  Be careful not to get any water inside the bottle it can mess up your clay.  Once the ship is ready your all set.

Thanks for reading!